2020-12-12

Use American Express gift card on Amazon

 I ran into a snag trying to load my Amazon gift card balance with prepaid American Express gift cards.  I learned what went wrong and was able to correct it, so I hope this article will help you get it right the first time.

The ideal way to use the gift card is to add it as a payment method in Amazon, then use the "Reload your gift balance" function to convert your Amex gift card to Amazon credit.  Then if you need to make purchases that would be split between your gift card balance and your default payment method, it will go without a hitch.

The caveat at the time of this writing is, when you add the gift card as a payment method, Amazon will validate the card by requesting a $0.10 auth on it with the issuing bank, which will lock that amount, leaving you $0.10 less  than the full amount of the card that you can reload your gift balance with.

That said, if you have a gift card for $100 and you want to use it on Amazon, you're really going to reload your gift balance with $99.90 instead of $100.00

Steps to load your American Express gift card into Amazon:

  1. Add your card as a payment option in Amazon
    1. Log into Amazon
    2. Navigate to Account | Your Payments
    3. Click on the "Wallet" tab if not already there.
    4. Under the "Cards & accounts" section, click the "Add a payment method" option
    5. Under the "Add a New Payment Method" section in the right pane, under "Credit or debit cards", click the "Add a credit or debit card" button.
      1. Enter the card information
      2. Uncheck the "Set as default payment method" button
      3. Click the "Add your card" button
      4. Make sure it was successful
  2. Verify the hold Amazon placed on your gift card by going to the Amex Gift Card Balance website. NOTE: This can take up to 15 minutes to appear...
    1. At time of this writing, my auth hold was $0.10, but your mileage may vary depending on when you attempt it.  If you confirm the amount on the Amex website, you will know how much to deduct from the full amount when reloading your Amazon gift balance.
    2. UPDATE 2022-12-09: Amazon didn't apply the $0.10 after 15 minutes of adding the card as a payment option in Amazon.  It waited until I executed step 3 below (purchasing the "Amazon Reload"). I made the mistake of trying the full amount since I hadn't seen the $0.10 hold.  Amazon accepted the purchase, but being suspect, I went back to the Amex Gift Card Balance site and looked at the transactions again. The $0.10 Pending Transaction immediately appeared.  So I get to contact Amazon and tell them to cancel and try again with the $0.10 deducted.  Lame. 

      My recommendation is to just proceed to Step 3 and immediately load the balance assuming you won't be able to use the $0.10
  3. Reload your gift balance on Amazon
    1. Navigate to Account | Your Gift Card Balance
    2. Click the "Reload your Balance" button
    3. Enter the adjusted amount in the "Enter an amount" textbox (in our example of a $100 gift card with a $0.10 hold, you would enter $99.90)
    4. Select the American Express "credit" card under "Your credit and debit cards"
    5. Click the orange "Reload $99.90" button
    6. You will get the message that the order is being processed and should receive an email a few minutes later confirming that the balance is reloaded.
Amazon will not allow you to edit or cancel a "Reload Your Balance" order, so attempting to load your entire card while the auth hold is in place, will result in your order becoming stuck in a "Payment revision required" loop where Amazon will email you stating the transaction was denied and that it can't be completed unless you revise your payment method.  Revising your payment method means logging in to Amazon and changing which card you're using to reload the balance.  Since you don't want to use a different payment method, you are left to contact Amazon support; who will be tempted to tell you that the hold is at the bank and that you need to contact the bank... or they will mention that you entered the credit card information incorrectly and will need to correct it.

Neither will be true... you simply tried to reload more than what is available on your gift card... so the support agent will be required to cancel the order so you can place it again with the proper amount.  Again, you can discover the proper amount by investigating the auth hold on the Amex Gift Card Balance site... then subtracting that amount from the total of the card.

Happy shopping!

2020-03-21

[SOLVED] Remove bad autocomplete suggestion from Google Chrome

At some point we all do it.  In a big hurry to get to a commonly visited website, we quickly start typing the URL into the address bar of Google Chrome, and mistype a part of it before hitting the ENTER key.  Once you realize the mistake, it is too late.  The auto-complete feature of Chrome has already remembered your URL and will now suggest it every time you try to type in the correct URL on future attempts.  It even seems to suggest it before the correct URL that you have previously navigated to in similar fashion; probably because it was entered into the browser more recently.

To solve this:

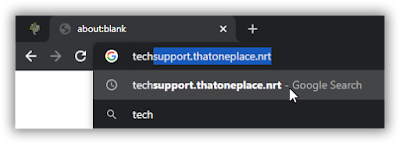
  • Start typing in the URL into the address bar and watch the autocomplete list come up with the bad URL:

Partially typed URL with bad URL auto-completing
(I typed "tech")

  • Highlight the bad URL by using your arrow keys (see screenshot above).
  • With the bad URL highlighted, hit SHIFT-DELETE.
The bad URL will disappear from the autocomplete list and you can get the URL corrected in the address bar to have it appear going forward when auto-completing.

Happy browsing!

2018-05-18

[SOLVED] Dolby Atmos isn't working with VUDU on my Roku Ultra!

If you are experience audio playback issues with your home theater system while trying to play UHD movies with Dolby Atmos soundtracks through VUDU on your Roku device, but can play other Dolby Atmos movies through other means (like Blu-Rays), try the following:

  • Start at the Roku Home screen
  • Navigate to: Settings | Audio | HDMI and S/PDIF
  • Make sure the setting is "Auto detect" (not one of the other issues that can force formats)
Roku: HDMI and S/PDIF audio setting configured for "Auto detect"
For a detailed explanation of what was happening with my own system when I encountered the issue and how I came to the solution, see my detailed write-up on it.

I hope this helps save someone some time so you can spend it enjoying those amazing Atmos soundtracks!

2017-10-22

[SOLVED] Unable to remote desktop LAN computers after router upgrade

The Fix:

Make your Windows 10 device discoverable (which will convert the network from Public to Private.)

If you were using the computer when the new connection was detected and connected to, Windows 10 should have prompted you when it detected the new network asking if you wanted to make it discoverable.  If you missed that prompt or answered "No" when it asked, you will need to reconfigure that setting.

Steps to fix:

On the machine you want to control, do the following...
  • Hit your "Start" button and type "ethernet"

  • Click on "Change Ethernet settings"
  • On the Ethernet settings view, click the name of the network you need to configure.
    (In my case, it was "Network 11")
  • Toggle the "Make this PC discoverable" switch to "On"
  • Try connecting via Remote Desktop to said machine with another device on your network


Why it Happened:

After upgrading my router tonight, all of my Windows 10 devices detected a new network and automatically decided they would be "Public" and defaulted the device to be undiscoverable.

The problem for me was, one of my devices is a server that has no keyboard or monitor hooked up to it.  I needed to remote in to make sure some services were up and running again.  I had to track down a monitor, DisplayPort-to-HDMI cable and keyboard to be able to access the machine and get it configured so I can remote again.

While frustrating, this is actually a useful feature of Windows 10 to assume that any new network if potentially dangerous and default it to Public.

I hope this helps save someone a few hours of frustration thinking your new router is defective!

2017-03-16

[SOLVED] Change login credentials in Remote Desktop Connection Manager v2.7

I love using Microsoft's Remote Desktop Connection Manager v2.7.  It's a useful tool and I wish it were still being maintained.  There are some funky things with it that keep it from being perfect (what software is?) but this bugger is the hardest for me to remember the workaround.

I had issues trying to get credentials changed in Remote Desktop Connection Manager after my password expired on the servers in a group. I was trying to get to it by doing:

  • Right-click the group name | Select "Properties"
  • Go to Login Credentials
  • You'll see that the options are disabled
SOLUTION:
  • Right click the root node of the left pane | Select "Properties"
  • Click on the "Profile Management" tab
  • Highlight the Profile you need to change | Click the "Edit" button
  • Make the necessary changes and click the "Save" button
  • Click "OK" to get out of the Properties dialog
  • Click "File" | Save or Save All
Hope this helps!  I know I'll need to come back and remember this in 75-90 days when the next password reset comes around.

2015-05-23

[SOLVED] Samsung Data Migration "An error occurred while writing to the Target Disk" 301001

QUICK ANSWER:
Make sure your source drive is Disk 1 and target is Disk 2 (whether that is forced via physical connections or configured in your BIOS) -- please leave feedback if there is a better way to articulate this answer!

Read on below for more details if you need them...

Today I was required to clone a Samsung 840 EVO SSD that has been intermittently failing ever-increasingly in the past couple of weeks.  My new drive is an 850 EVO.

I connected the 850 EVO via a Thermaltake USB 3.0 dock.

The Samsung Data Migration software happily detected both drives (although the software listed my 840 EVO as a "Generic- Compact Flash USB device"), but when I started the clone, after about 8 seconds, the software stopped with the following error:

"An error occurred while writing to the Target Disk"
(with the error code 301001)
Perplexed because it detected the drives fine, I began investigating.

After playing around with a few ideas, I had the thought that maybe it didn't like the fact that I was plugged into an external dock.

Unfortunately I didn't have any extra cables, so I had to unplug a secondary internal drive to be able to plug my 850 EVO in.  This worked like a champ and I'm about 46% finished cloning as I'm writing this.

I began writing this with the intent to tell my readers that you need to plug it in to the internal and not use an external adapter.  However, with further investigation, I discovered the following in Samsung's Data Migration Software manual (English - other languages here) under "Limitations" on page 5 of the PDF:
#5. "On systems with two(2) drives of more (e.g. "C:", "D:", and "E:" drives) with the operating system installed on the "C:" drive, only the first two drives will be cloned.  The "System" partition that is created during Windows installation is automatically replicated.
Now I may have read this incorrectly, but it suggests to me that you need the Source disk as your first HD and the Target as your 2nd (whether that's configured through plugging into the correct ports on your motherboard or set in your BIOS I am not certain at this time) for this to work.

I think it worked for me because I limited myself to the two SATA drives so there would be no confusion (though that only happened because I needed to use the storage drive's SATA cable and power.  LOL

I would love to hear from you if you have had a similar situation... especially if you kept more than two drives connected and/or if you successfully used a USB/SSD dock/adapter.  I would imagine those with thin laptops that can't connect a second drive would need that to work.

I hope this helps save someone some time!

2014-06-26

[SOLVED] Adobe Flash not working on Windows Server 2012 in Internet Explorer

I've been accessing a web site that uses Adobe Flash.  From a Windows 2012 Server using Internet Explorer, however, it always asks me to install Flash.  No matter how many times I install Flash, I'm constantly told that Flash is not installed and prompted to install it again.  The Flash content never displays.

From searching the web, everything I found talked about enabling the "Shockwave Flash Object" under "Manage Add-ons".  However, I never even see the Shockwave Flash Object under Manage Add-ons, regardless of the number of times I've uninstalled and re-installed Flash.

I finally figured out the answer.  By default Windows Server 2012 does not allow you to use "consumer" level features like Flash.  Flash is installed but disabled, and there is no way to enable it without installing the "Desktop Experience" feature.  Servers are intended to use a web browser for setup of the system, but not for consumer level things like Flash.  You have to install the consumer level features on your server.

To fix this, run Server Manager on your Windows Server 2012 machine.  Select Local Server and scroll to the bottom in the “Roles and Features” section.  In the upper right corner select Tasks > Add roles and features.


Press Next through the screens until you get to “Features”.  Scroll down to the bottom and open up “User Interfaces and Infrastructure”.  You will have 2 of 3 installed.  The missing one is “Desktop Experience”.  Check “Desktop Experience” and press Next until you are finished.  Then reboot your server.  Flash should now be enabled, and you will see "Shockwave Flash Object" in the "Manage Add-ons" dialog.


Here is the link where I found the answer:

Hope this helps!